How to Create a Facebook Group in 2026 and Set Up Properly


The only guide you will need to create or get started with Facebook group and setup properly.
If you already have a Facebook group, this guide is going to help you to check your Facebook group setup and adjust accordingly.
This guide is created from years of experience with Facebook group management.
We have individual blogs on various features of Facebook group. If you want to learn in detail just click on the links and visit the detailed blog.
Let’s start...........
Before I show you the steps to create a Facebook group, let’s learn about the following points so that you can start with a right type and category of Facebook group.
Types of Facebook Groups Based on Privacy
1. Public: People can see the activities of the Facebook group but cannot participate(react or comment) unless they join the Facebook group.
2. Private(Visible): People can see the Group Name and description. Members are unable to see the inside activities of Facebook group unless they join the group.
3. Private (Hidden): Same as private Facebook group with some extra layer of privacy. These are groups are visible to members who have joined or have the link of the group.
Read: Public vs. Private Facebook Group
Now decide and choose the best type to create your Facebook group.
How to create a Facebook group: Steps Shown
Step 1: Click on the Groups icon, then on ‘Create New Groups’

Step 2: Give a name to your Facebook group. Name is very important.

Facebook Group Name Ideas
How to change Facebook group name
Step 3: Choose the privacy of your Facebook group as described above, invite your friends(optional).
You can also invite your Friends in the Facebook group later as well. Finally click on Create button and you are done.

So, you are done with creating your Facebook group.
Does it mean everything is done? No, there are lots of other things. Let’s learn those.
Categories of Facebook Group
Do you know there are various categories of Facebook groups?
If yes, that's great and I am sure you have already decided which kind you are going to choose.
If not, here are the categories of Facebook group you will find.
Facebook presently offers six different types of Facebook groups that anyone can use:
- General
- Buy and Sell
- Social Learning Group
- Gaming
- Jobs
- Work
- Parenting
How to Setup Facebook Group Properly
Setup your group the way you want. But if you know the important settings and features it will be easy for you to customize your group and give a professional look.
Mandatory Setup for Facebook Group
You can run your Facebook group without the following setups. But to me, these points seemed mandatory and primary things for anyone who is planning to create a Facebook group.
Add a Cover Photo
Cover photo of your Facebook group will give the first impression to anyone who will come across your group. So, spend some time and design an attractive and informative cover photo. The ideal Facebook group cover photo size is 1640 x 856 pixels. The aspect ratio is 1.91:1.

Keep in mind that your cover photo should demonstrate the value you are providing through your group. It should contain the summary of your group in a pictorial format. You can take the help of online photo editors to make a perfect cover photo.
Write Description of Your Group
After cover photo, anyone who will see your Facebook group, will also be able to see the description of your Facebook group. Write a simple description about your Facebook group with sentences. People should understand what your Facebook group is all about.
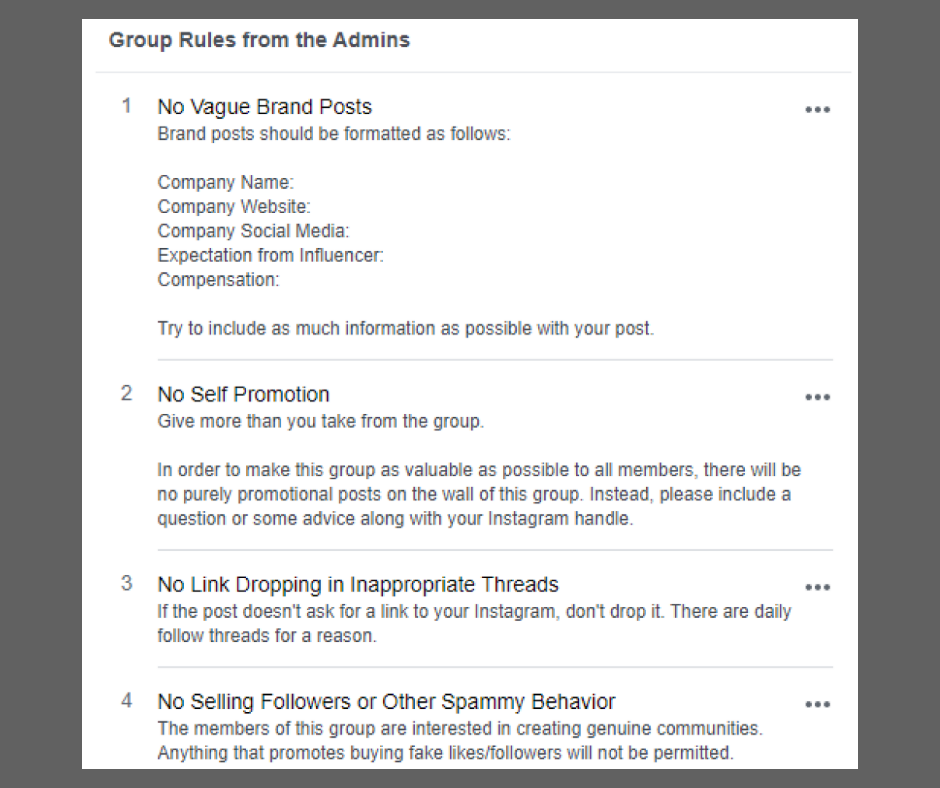
Set Rules for the Group
Serious group creator should keep the Facebook group spam-free. Facebook allows for ten general rules for any given Group. For reference, Facebook’s suggestions for Group rules include:
- Encouraging positive comments, feedback, and conversations
- Taking a firm stance on bullying and hate speech
- Outlawing spam and irrelevant links
- Respecting the privacy of fellow members
Based on the type of your Facebook group and your requirement set rules of your Facebook group. Better not to make the rules too strict.
Optional Setup of Facebook Group
The reason I told these setups are optional, cause you can run your Facebook group without these.
But if you go through the following features of Facebook group, you will understand how important are these.
Add Membership screening questions
You can set membership questions of build your group with genuine people. You can ask a maximum of three questions to the members who will send the joining request.
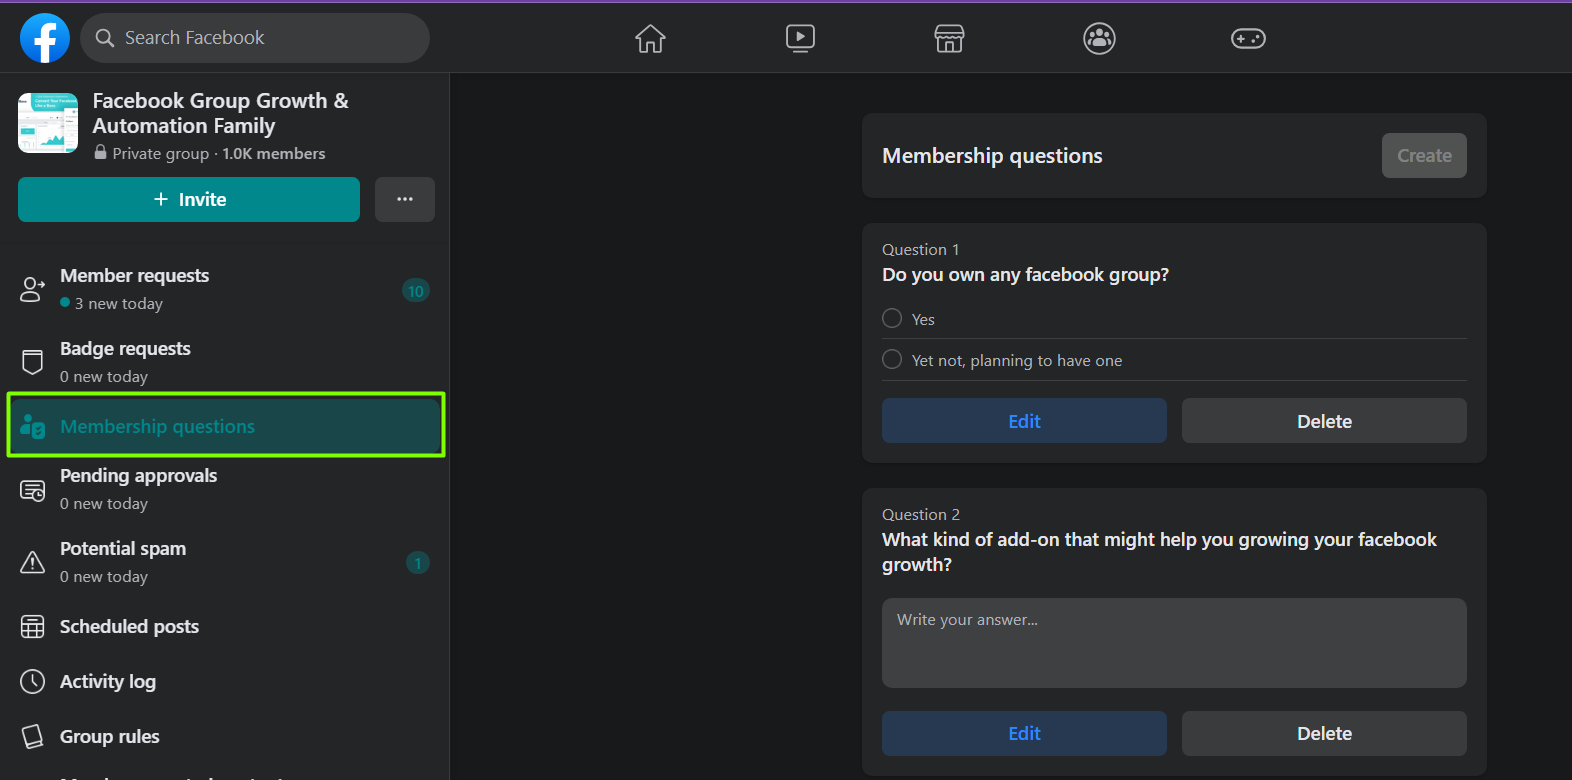
These membership screening quesitons are very important for a Facebook group admin. Let me teall you one.
You can generated unlimited leads by levearing these membership questions.
We have a deailed guide on Facebook group membership questions with question samples collected from various groups.
Personalize Facebook group link
It is unknown to many Facebook group admins that the default group link you get with numbers from Facebook.
Default group link example: https://www.facebook.com/groups/123456789
You can customize your group link to give it more professional link while sharing with others.
Customized group link example: https://www.facebook.com/groups/groupboss.io
I hope you can see the difference between these two Facebook group URLs.
Admin Assists in Facebook Group
Facebook has brought many automation under Admin Assist feature to ease up the group management by the admins. But you need to setup conditions to apply those automations.
No worries, we have a detailed guide on Admin Assist.
More Things to Learn About Facebook Group
Let's learn some more things about Facebook group that will help us to manage our group more efficiently.
Group Settings
Other than above mentioned setups, you can even customize and change many things from the Facebook group settings. For example, you can do the following:
- Add new member intro.
- Add location
- Add tags
- Change privacy
- Change group color
- Make group affiliation
- Add badges
- Who can join the group.
- Who can approve the members.
- Sorting posts and comments
- Identifying potential spam and many more.
Guide to Facebook Group Post
It's easy to post in Facebook group. So, what to learn here?
Yes, there are things you should learn while posting in your or other Facebook groups. You may go through the following guides we have to learn more about about posting in Facebook group.
Admin and Modertors in Facebook Group
May be you would be able to manage your group single handedly once you have fewer members. Once the member increases, you should be thinking about adding more admins or moderators.
Following guides are going to help you learn about Facebook group admin and moderators along with their rules and responsibilities.
Tagging All Facebook Group Members
Once you have an important announcement or a serious post that you want all the members should see, you can tag all the members and they will get a notification. Read our following blog on how to tag everyone in Facebook group.
Polls in Facebook Group
Group admins often create polls in the Facebook group for various purposes. It can be-
- For taking a decision based on mass voting.
- Prioritizing an event timing.
- Asking for features and many more.
Read our detailed on this.
Files in Facebook Group
You do not need take help for extra platforms to store your files or to share those with your group members. You can add files in your Facebook group and keep those stored there.
Events in Facebook Group
Create events in Facebook group for important occassions. We know about creating events in Facebook pages. But many of us do not know about the events on Facebook groups.
What Next?
So, you have learned the basic things about creating a Facebook group. Now, create a Facebook group and apply the above settings. However, there are many features in Facebook groups that you can leverage and take advantage of.
Bonus Part: Reasons Why You Should Create a Facebook Group in 2026.
1. Have a Free Lunch!
There ain't no such thing as a free lunch, but now it is! A Facebook group can provide you with a plethora of opportunities.
You will eventually know them all at the end of this article but before that, acknowledge you're getting them without costing a penny! You will get the outcome that was initially desired, but they won't cost you a dollar when you make it through Facebook groups. Grab the free lunch!
2. Make Your Facebook Page Work
Remember the number of dollars you paid Facebook to run a page? Make those dollars count by creating a Facebook group and driving people toward your page. These are hard-earned money, and you can't just let them waste in the trash box.
A Facebook page is generally owned media, yet you need to target your audience and pay Facebook accordingly for your urge to hit the success bar. But before that, give it a try by opening a Facebook group that would contain the target society where you intend to put the investment. Drive them towards your page, and that's it. Now the dollars talk!
3. Create the Dream Business Network
There is a saying in English- "If you want to go fast, go alone. If you want to go far, go together."
Facebook group is a well-constructed platform that brings together the people you need to develop your business. People might be from diversified backgrounds, but that's not an issue. But this diversity might push them to converge on a platform because they might need the same product!
Be the captain of the converging ship, let them know who you are, and what you sell, and then see how a mere Facebook group generates cash flows for your business. The network pays off, so build it where the base is strong.
4. Less to NO Advertisement
Facebook pages are fantastic, but the annoying advertisements are awful. While a Facebook page can generate revenue for your business through continuous ads, these ads can demotivate people to pay a visit the next day.
Facebook groups, on the other hand, don't show a lot of ads. Most of them don't have any ads! It's an advantage Facebook groups enjoy over Facebook pages. So, open a group and let your customers roam around it without interruption!
5. Provide Customer Support in a Perfectionist Way
Customers are king. They aren't just happy purchasing your goods and going home with them. They have complaints and dissatisfaction. You can't let them down as you declare them kings in the first place. Post-purchase activity such as e-commerce customer support is a significant issue we often forget to look after.
A Facebook group could be a resounding platform for serving your customers beyond the purchase stage. Let them raise their voice! Let them find out the flaws in the group in front of thousands! It would help you grow in the longer term. A company that knows how to expand won't lose an angry customer; it re-earns the angry customer.
6. Bring Like-Minded People Together
Keeping up with respect towards diversity, we also need to focus on growing a business where like-minded people thrive together. There goes a proverb- "too many cooks spoil the broth." That's true, but not when we create symmetry in the most synchronized way.
Likeminded people are needed to grow a business as they don't spoil the moments for you. They appreciate, celebrate, and rejoice in your success. They stood for you when you needed them the most.
By like-minded people, we mean those loyal customers who brought you to the position you are guarding right now. Create a Facebook group, get these people together, generate the word of mouth, and see how things start improving exponentially.
7. Value Your Brand Owners
Now that you brought like-minded customers and allowed the influx of diversity in the group, it's time to acknowledge the value the brand owners deserve.
Who are the brand owners? It's not merely the brand founders and controllers. The ultimate value of a brand relies on customers, and they own the brand. As we can see on a Facebook page, these customers are known as fans and followers who like and follow that brand. In the case of the group, it's not the same thing.
A group contains the customers who are its members. The word 'Member' provides the people in the group with an identity and creates a sense of belongingness. The group admins and moderators should acknowledge that and definitively value the members.
8. Foster the Two-way Communication
From the last point, we saw how a group could provide more value to customers. The members of a group have a voice. In the case of a page, the page owner rules it, and the customers see what they are shown. The mere interaction in the comment box or inbox doesn't suffice the communication needs.
But a Facebook group is more than that. It provides the opportunity to post, share, and vote. A customer might have feedback and complaints. On a Facebook page, they hardly find a way to break through.
On the contrary, a Facebook group lets the customer be the trouble-finder or sometimes the troubleshooter. That's how a more interactive and practical communication space is created in the Facebook groups.
9. Test Your Ideas and Validate
Do you want to bring a new product or service to the market? Do you want to know in advance how much response you'll be getting? The Facebook group could be the best possible platform to test your idea and getting the validation behind bringing novelty.
Facebook groups have a poll feature where the poll owner can see how many votes are cast for and against a motion. An open-ended idea might contain numerous options to vote for, and a group member can add a new option to vote.
Thus, if most people generally welcome your concept, you can take a shot. If the opposite happens, you won't lose the money you were supposed to put into your brainchild idea. No doubt, it's a win-win situation.
10. Collect Ideas in One Place
A Facebook group can enable you to bring all the ideas of the relevant people together. Many of your group members will have such thoughts in mind, which, if you can implement them, would take your business to a different extent. That's why notifying about the flaws through customers' complaints could be a blessing.
While you can also generate ideas through myriads of processes, this platform brings those for free. The scattered idea in your page's comment box, inbox, and other media is worth collecting but time-consuming and a super strenuous job. So, create an account and see the magic by yourself!
11. Collect the Required Information in the First Place
While approving the members in your group, you can add three membership questions. This questionnaire should be made to analyze what information is necessary to have and what not to.
A member who would like to join the group voluntarily or through a friend's invitation has to answer these questions. So, it means that he is eager to be a member considering his interest. Grab the opportunity to ask the requester politely what you need as information.
Now you can leverage the information to take further steps.
12. Generate Leads
A Facebook group will give you the chance to generate leads and prospects for your business. The questionnaire you designed intellectually to get information that provides you with a business edge is the weapons.
Note that it's tough to manage all the information at times. Storing the info and approaching the prospects is not a walk in the park. Using Customer relationship management software like Groupboss, can help you save your precious time and effort.
FAQs About Facebook Groups
Is it free to create a Facebook group?
Yes, creating and running a Facebook group is completely free. You don’t need to pay to manage or promote your group organically.
What’s the difference between a Facebook Page and a Facebook Group?
A Page is a public profile meant for businesses, celebrities, or organizations. A Group is a space for community building, discussion, and interaction among members with a shared interest. Groups are more interactive and member-driven, while Pages are more about broadcasting content.
Can I monetize a Facebook group?
Yes, indirectly. While Facebook doesn’t directly pay you to run a group, you can monetize it through several smart strategies:
- Promote products or services (your own or affiliate offers)
- Offer exclusive content such as ebooks, guides, or training
- Build and grow your email list for future promotions
- Drive traffic to your website or landing pages
- Make your group private and accessible only via subscription
- Host online virtual workshops, masterclasses, or paid webinars
- Sell digital downloads like templates, printables, or courses
- Offer coaching, consulting, or freelance services to members
- Use platforms like Patreon or Buy Me a Coffee to monetize exclusive group perks
- Sell sponsorship or promotion slots to relevant brands inside your group
There are also features like subscriptions and partner monetization, though eligibility depends on Facebook’s criteria.
Final Words
To conclude, Facebook groups are no longer limited in our social needs. They are thumping the other platforms and cruising to provide the business owners with relative ease and breathing space.
Nowadays, the breathtaking success stories of many online e-commerce platforms are once developed through these groups, and a group on Facebook can provide you with wings to fly higher than you could ever imagine. So, what's stopping you not to give it a try? Open a Facebook group today for your business and let your business get an ever-glowing flourishment.